| Main configuration
Quick note:
- Double-click on the tray-icon of IDScenter to display the configuration
dialog (right-click on the tray-icon and click on "Settings"
works too)
- Click on Apply to generate a configuration/save
configuration (after setting all the options needed in IDScenter)
- If an error should occur, it will be displayed in "Overview"
panel
- Start Snort: Starts Snort in console mode / service mode
- View alerts: open log viewer
- Test settings: After configuration you can test the settings by
clicking on this button
- Reload: Reload the configuration
After starting IDScenter you will see a small round black icon in the
system tray. Double-click on it will open the configuration interface
(1).
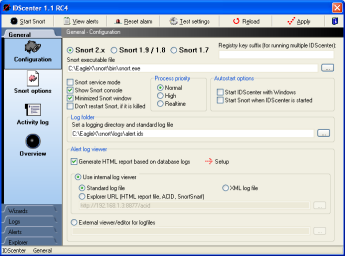
IDScenter configuration interface (Main panel) |
There are two ways to setup Snort
with IDScenter
- Snort console mode
- Snort service mode
The advantage of service mode is, that Snort can monitor your
network constantly even when you're logged off
- Select Snort version (Recommended: Snort 2.x)
- Set the location of Snort binary file
- Activate service mode only if needed (NT/2K/XP/.NET)
- IDScenter will try maximum 15 seconds to start the service
- Select options:
- Show Snort console will show the Snort console window
- You can start the console window minimized
- You can prevent the automatically restart of Snort if
it crashes
- IDScenter and Snort should be started with Windows
- Click on both checkboxes to make this
Note: When Snort is in service mode, IDScenter will take
over control of Snort service
- Process priority: Snort can be launched with different priorities
(Snort console mode)
- Log file
- Set a log file to which Snort will log (full path name)
- DONT use the same folder as Snort binary
is located!
With activated Log rotation, IDScenter will move all
files in this folder if activated
- Note (keep in mind): later you will have to set
the same log file for an output plugin! Give there as
parameter only the filename and NOT the full path
|
- Generate HTML report based on database logs
This is a very powerfull feature which allows you to generate
reports using the Database logs logged using output_database
Snort plugin.
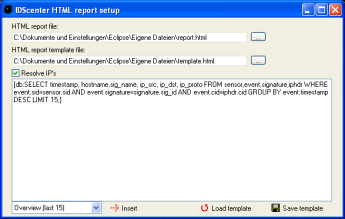
- HTML report file: Set the output filename
- HTML report template file: Design your report template
file. Simply add [db: your_query_here] keywords and IDScenter
will generate output tables based on the query with decoded
packet information and using a fast and multi-threaded
DNS query engine (probably you can find it in dev section
in near future)
- If you don't know SQL you can use the basic queries
provided by IDScenter. Simply choose a Query in the combobox
and click on "Insert"!
- Log viewer
- Choose between internal log viewer an external log viewer
- Internal log viewer:
- Standard log file: for reading a text log file (use
this with file output plugins)
- XML log file: use IDScenter XMLServer to log XML data
from Snort XML plugin to a file. Set here the filename
which is used by the server.
- Explorer: a website/HTML file/XML file can be displayed
by internal log viewer. This is usefull when you have
ACID, SnortSnarf, Snort2HTML, etc.. for viewing log file
|
| 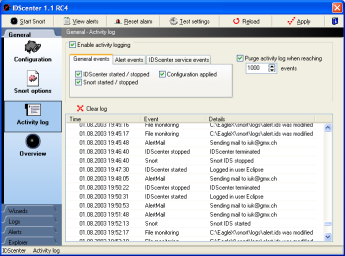
Activity log panel
|
- In this panel IDScenter displays events
- You can select which events are monitored
- You can let automatically purge the activity log
- Clear log: clear the logging entries
|
| 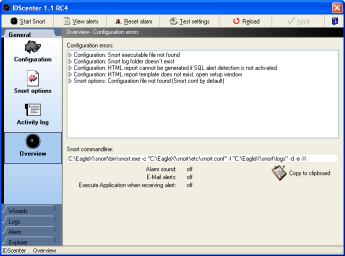
Overview panel
|
- In this panel IDScenter displays errors
- Should an error occur when you click on apply, you'll
be informed here
- MySQL alert detection: if the database is unavailable,
a message will be displayed here (the window open's automatically)
- An overview of the alert features activated is shown here
- "Copy to clipboard": you can copy the Snort command-line
into clipboard
|
IDS rules - Snort configuration file
You can configure Snort configuration file manually and/or using the
wizards.
Note: Unknown preprocessors supported if you configure them manually.
Unknown output plugins are supported and will not be lost by saving
the configuration (by clicking on "Apply").
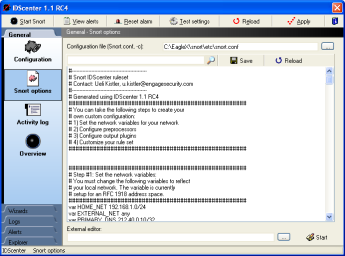
Snort configuration file |
- Set the configuration file
This is usally "Snort.conf" in the "etc"
folder where Snort was installed (e.x. "C:\Snort\etc\snort.conf")
- You can find a pattern in the configuration file by typing
it into the editbox and click on the search button
- You can set an external editor for editing Snort configuratoin
file
|
| 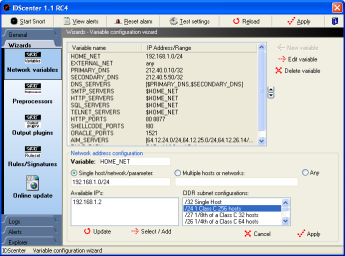
Variable wizard
|
Note: IP's are set like using
CIDR format for subnet network masks.
Varibale wizard - how to set the variables used in rule files
- Setting variables is important: this varibales are used
in rule files
- Set the variables IP address/range like this:
- Single network address/host:
For example: 192.168.1.0/255.255.255.255.0 is 192.168.1.0/24,
a single host has subnet /32
- Multiple addresses: click on "Multiple hosts or
networks" to add multiple networks/hosts. Use commas
to seperate the IP's!
- Any: will monitor 0.0.0.0 (all)
- HOME_NET must be set to your network address or any
- For example: 192.168.1.0/24 (see above)
- EXTERNAL_NET must be set to WAN network address
- For example: Any .. or !$HOME_NET (means "not HOME_NET")
- DNS_SERVERS should be set to your DNS servers
- Select multiple hosts, type the primary and secondary
DNS server IP address
- For example: 212.40.0.10/32, 212.40.5.50/32 (/32 for
single host.. and this is the case)
- RULE_PATH: You should set this to your
absolute pathname where you've the rule files (e.x. C:\Snort\rules)
- The other variables set the IP's of the HTTP and SQL servers,
etc..
- You can add some new variables to use them in own rule files
|
| 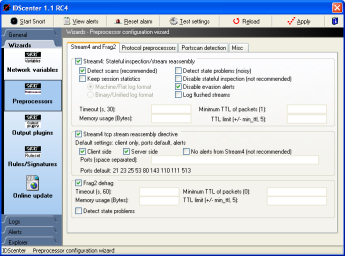
Preprocessors wizard (page 1)
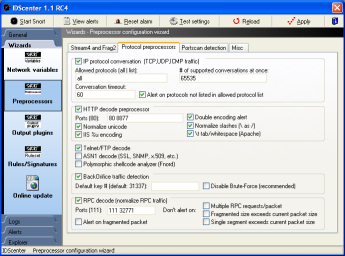
Preprocessors wizard (page 2)
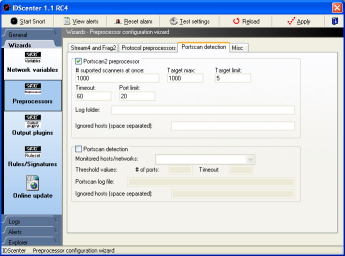
Preprocessors wizard (page 3)
Preprocessors wizard (page 4)
|
Here you can select and configurre
the preprocessors used by Snort.
For detailed information please read the Snort manual pages
(snort\doc\SnortUsersManual.pdf).
Preprocessors wizard (page 1)
- Stream4 must be activated to use Stream4 reassembly directive
- Frag2: IP defragmentation plugin. It is recommaneded to
enable this to defeat fragmentation attacks (for example using
fragrouter). There are several techniques known to bypass
IDS attack detection using fragmented IP packets!
Preprocessors wizard (page 2)
- "IP Conversation" plugin: used by portscan2 and
by some other preprocessors (see Snort manual)
- HTTP decode: For detailed information use Unidecode instead
of HTTP_decode
- Telnet/FTP decode: does perform preprocessoring for Telnet
and FTP traffic
- ASN1: Read Snort Manual for detailed information
- Polymorphic shellcode analyzer: Detects shellcode
- Back Orifice: You should ABSOLUTLY disable brute-force..
at least you have a supercomputer :o)
- RPC decoder: decodes RPC protocol and normalizes RPC traffic
(see Snort manual for options)
Preprocessors wizard (page 3)
- Portscan2 preprocessor: You should ignore $DNS_SERVERS..
else you will have alerts of portscans only because of DNS
requests
- Portscan preprocessor: You should ignore $DNS_SERVERS..
else you will have alerts of portscans only because of DNS
requests
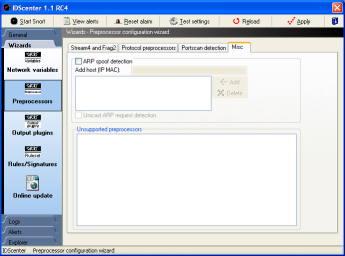
Preprocessors wizard (page 4)
- ARP spoof detection:
- Defeat ettercap/angst/ghost portscanner.. etc.
- You have to add all IP's and their MAC address of your
network to allow this preprocessor to detect sniffing
attacks and other attacks using ARP spoofing
- Unsupported preprocessors:
- All unsupported preprocessors are listed here and can
be configured manually
|
| 
Output plugins configuration wizard
|
Here you can setup all output plugins
and also ruletypes!
For detailed information read the Snort manual page please!
There are many small wizards in this panel which will help you
to configure the output plugins of Snort. The screenshot shows
a configured syslog output plugin.
Adding output plugin
- Click on "Add" and choose the output plugin in
the popup menu
- Set up the plugin with informations from Snort manual
- Click on Add (in the small wizard dialog!)
- To create ruletypes type a name, choose the mode and click
on "Create type".. this will allow you to have different
logging possibilities, but the rules must also be changed
for this.
- Note: Not needed, Snort will log using default
output plugins. If you create log types, you have to modify
IDS rules also!
- If you want add add plugin to a ruletype (see Snort
manual for more informations), click first on the ruletype
and then on "Add"
Editing output plugins
- Click on a list item to edit it. If you're done click on
Add in the dialog to apply the changes
|
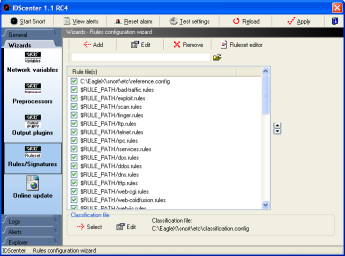
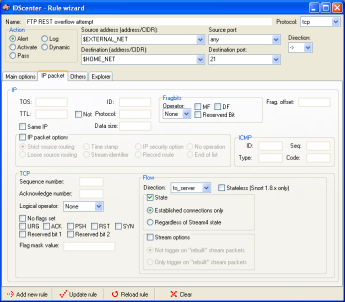
Rule configuration wizard |
The ruleset wizard will help you maintain a
good ruleset. This is the "include"-part of the Snort
configuration file
- Select first a classification configuration file
- by default: "classification.config"
- Edit the item, so that it points to the real path (e.x.
C:\Snort\etc\classifcation.config)
- Select the reference configuration file
- by default: "reference.config"
- Edit the item, so that it points to the real path (e.x.
C:\Snort\etc\reference.config)
- Activate/Deactive the rule files you want to use
- Open a ruleset in the ruleset editor:
- Select a ruleset file
- Click on "Ruleset editor"
Note: Updating rulesets is IMPORTANT. It's like updating
your antivirus signature file.
|
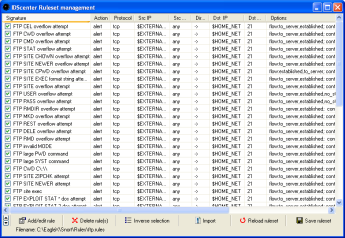
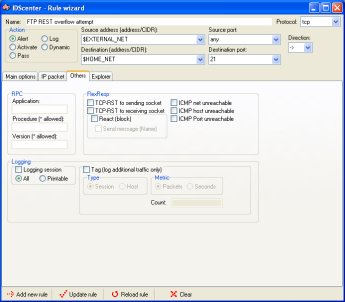
Ruleset editor |
The ruleset editor lists all available rules
in the file.
- Add (and clone) new rules / delete rules
- Edit a rule
- Select a rule and click on "Add/edit rule"
- Activate/Deactive the rules you want to use
- Import additional rules into the ruleset (in Snort 2.x syntax)
- Save the ruleset after modification
|
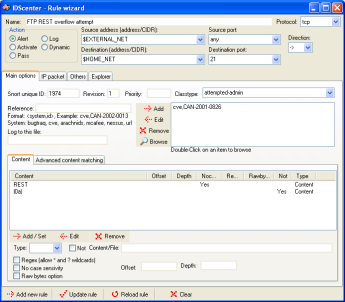
Ruleset editor page 1 |
The rule editor allows to modify Snort rules
(supporting Snort 2.x syntax).
- It is strongly advised to read the Snort manual before editing
rules (or at least know something about network traffic)
- "Add new rule" adds a new rule into the ruleset
list
- "Update" does simply update the rule you are editing
- "Reload" restores the rule you are editing
- "Clear" clears all fields
- Double-click on a reference list item will open the website
with the information
|
Ruleset editor page 2
Ruleset editor page 3
Ruleset editor page 4 |
The editor provides a front-end to all Snort
2.x rule features
- More information in Snort manual
- You can directly access information on the web about rules
using the implemented explorer (double-click in first editor
page on the reference item)
|
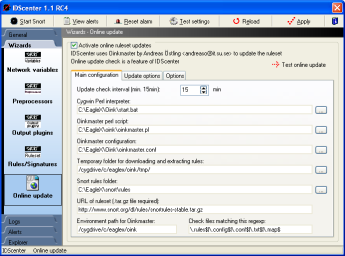
Online update |
The online update wizard is a frontend for configurating
Oinkmaster (by Andreas Östling)
- If you want to use this feature, you should download EagleX
package
|
Logging options
Packet logging and network options
Preprocessor settings
Output plugins command-line options
Rule options
|
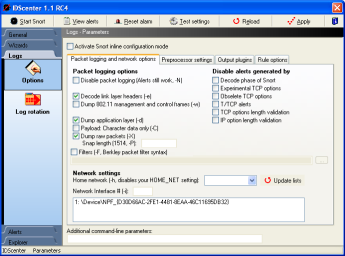
Packet logging and network options
- Set the parameters (command-line parameters) of Snort
- More information in Snort manual
- Network settings
- Select the interface Snort should monitor if necessary
(WinPCAP installed?)
- Home network setting: This option was used mainly for
Snort 1.6/1.7 but is still available
Note: You should set the HOME_NET in variables wizard
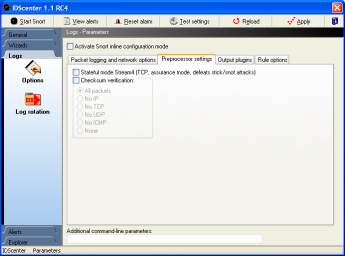
Preprocessor settings
See Snort manual for this Snort logging options
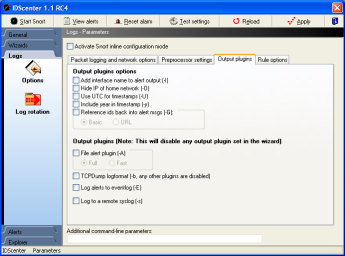
Output plugins panel
- Alert mode
- This will overwrite settings in snort configuration
file if set
Example: you set output plugin "alert_full: alert.ids"...
and selected "Fast". In this case Snort will
log using fast mode
- Log to a remote syslog
- You can log to a syslog daemon on *nix hosts... there
also exists some syslog daemons for Windows though (e.x.
Network Translation, Inc. Syslog32)
- Log to eventlog (of Windows )
- Note: IDScenter does not support this option
for alert detction
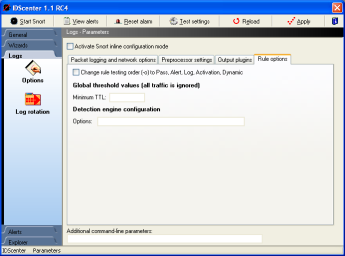
Rule options
- Change rule testing order: this is not recommended but possible
with this option
- Global threshold values: should only be modified if you
know what you are doing ;)
Additional paramters
There are more command-line parameters avaible which can be
added here
|
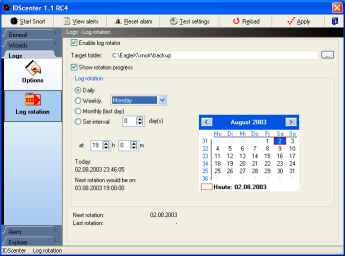
Log rotation |
Log rotation will rotate the alert logs by compressing
the files into a ZIP packages and move it to the Backup folder.
Note:
- If the IDS host should be down at this time, it will rotate
the files at the next time the host is booted.
- Snort will be stopped for the rotation and restarted automatically
Setup the log rotation following these steps:
- Select the backup folder
- Note: You should create a new folder for this
- Choose rotation interval
- Daily
- Weekly: select the day of week
- Monthly: rotation will be done the last day of the week
- Interval: Here you can set # of days til the next rotation
is done
- Time: set the rotation time
- The rotation progress can be displayed by clicking on "Show
rotation progress"
|
Alerts
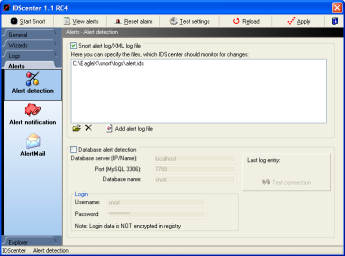
Alert detection |
- Select at least one alert detection mode
- File alert detection mode (up to 10 files monitoring)
- Add the files which should be monitored for changes
- At least the alert log file set in main configuration
panel should be set (this is added automatically by default)
- MySQL alert detection
- Set the parameters (hostname, port, etc..)
- Click on "Test connection" to see if IDScenter
can receive data from the database server
- This is also required if you activated "Generate
HTML reports" in the first IDScenter configuration
panel
Note: If the database is down, a message will be display
in "Overview" panel. |
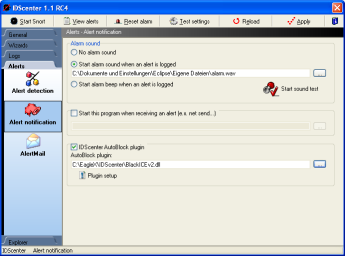
Alert notification
IDScenter's ISS NetworkICE BlackICE plugin
|
Here you can enable/disable alarm
sound, program execution if an alert occurs and AutoBlock (NetworkICE
BlackICE needed!)
- Alarm sound
- Select a WAV file if you selected "Start alarm
sound when an alert is logged"
- You can test if the alarm sound works with "Start
sound test"
- Program execution
- IDScenter will execute this program if an alert was
logged
This could be used to start a script that reconfigures
your router, generate HTML pages of alert log using an
external program, etc.
- AutoBlock - Plugin system
Note: Before using AutoBlock, activate file monitoring
and a file output plugin in the output plugins wizard
- All Snort 2.x log formats are supported. Unofficial
preprocessors are also supported!
AutoBlock generates a list of IP's, TCP/UDP ports and
ICMP information and passes it to a plugin.
For further information, have a look to he plugin framework
for Delphi (VCL memory leak fix is included)
- Select a plugin
- Open the setup of the plugin, by clicking on "Plugin
setup"
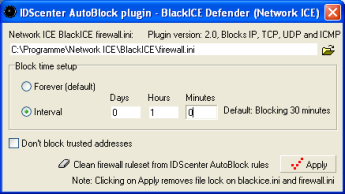
ISS NetworkICE BlackICE plugin (second version)
Included are 2 plugins for ISS NetworkICE BlackICE firewall.
The first does only block IP's. The second can block TCP ports
and UDP ports and has also ICMP blocking support (but not
all NetworkICE BlackICE versions do support the ICMP rules).
- Select firewall.ini
- Set a block duration
- Click on apply if ready
|
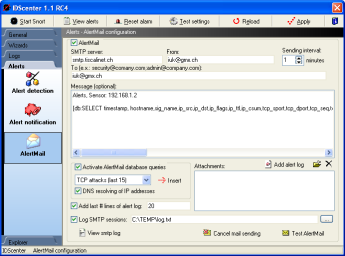
AlertMail |
AlertMail can send you alerts by
mail if Snort has detected an attack
- Set an SMTP server
- Set the sender's address
- Set the receipient(s)
- multiple receipients: seperate the e-mail addresses
with semi-colons (";")
- Optionally
- Set an e-mail message
- Add attachments (Snort must not be closed for this,
so you can send alert log file)
- Add # last lines of alert log file (for example: 10
last lines)
- Set an SMTP log file if needed
- You can activate SQL query engine:
- Add queries into your e-mail message ([db: yourquery])
- You can select predefined queries and add them by
clicking on "Insert"
- IP can be resolved into DNS hostnames using a fast,
multi-threaded code
- Alert notification: Database option must be configured
correctly!
- Click on "Apply" before using "Test AlertMail"
Note: If you want to cancel the current mail being sent,
click on "Cancel mail sending" |
Internal log viewer
Note: By double-clicking on tray icon if an alert
was detected does automatically open log viewer
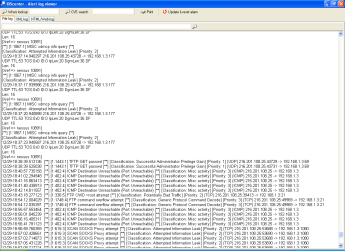
Alert log file in internal logviewer |
In alert logfile viewer you can
see the latest logged attacks.
- Search: type a word and click on the search button. To find
the next word matching the pattern click again on the button
- If you select an IP address, the logviewer sets this address
in the WHOIS editbox. With ARIS you can gain information about
an IP.
- If you select anything else, the logviewer sets this text
in the CVE search editbox
- You can print log file here
|
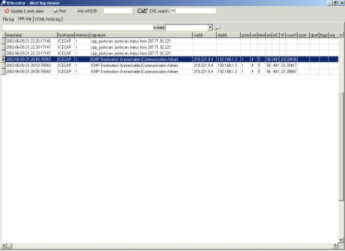
XML log viewer
|
The logviewer can display XML alert
log files. The IDScenter XMLserver receives the alert data from
Snort sensors that have the XML output plugin enabled (over
TCP/IP)
- Setup the XML output plugin on the remote Snort sensor(s)
- Setup the IDScenter XML server on the IDScenter host and
select a log file
- Set this log file as standard log file of IDScenter
|
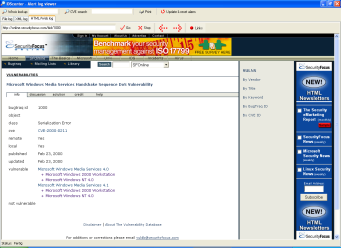
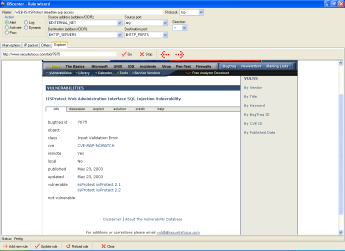
HTML/XML/Web site viewer
|
The logviewer can display Web sites
etc. using Internet Explorer.
- Type bugtraq, 1000 or cve, ... etc.
Support for: bugtraq, mcafee, arachnids, nessus, cve, url,
etc
The explorer is usefull if you want to use ACID, SnortSnarf,
Snort2HTML etc.
If you looked up information about something, you can print
the pages also. |
|